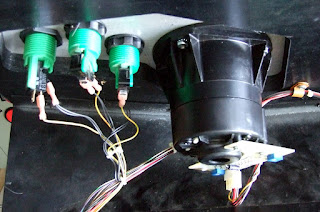
The joystick itself and how it connects are the main problems. The stick is very big and heavy, its depth from the baseplate (I don't know the real name) to the bottom (with a bit to spare) is 14cm, and the diameter is also about 14cm. I've tried some unusual solutions since I don't have the real panel. I bought a plant pot and a plastic box, but neither were strong enough to hold the joystick in place, as it's far too heavy. I think the best solution would be a big wooden box in the same style as a cabinet's control panel.


Because of the slightly different pinout, I made a JAMMA to JAMMA connector and then soldered a Molex connector to it. The game doesn't originally use this connector, it uses these red connectors as shown on the board here. I do have the original connector, but it's slightly broken so I just switched connectors over.
The pins used on the JAMMA connector are
| PARTS | SOLDER | |
| 25 L/R Player 1 | c L/R Player 2 | |
| 26 U/D Player 1 | d U/D Player 2 | |
Here's the connector on the joystick.

You can see (maybe) that the pins from left to right are X, +V, GND and Y. So this makes it easy to connect up. The +V and GND pins obviously go to +5V and Ground on your JAMMA harness and the X and Y connect to L/R and U/D respectively.
The buttons are wired a little differently too, which makes the JAMMA to JAMMA harness indispensible.
| PARTS | SOLDER | |
| 18 PL 1 DUCK | V PL 2 DUCK | |
| 19 | W | |
| 20 PL 1 JUMP | X PL 2 JUMP | |
| 21 | Y | |
| 22 PL 1 FIRE | Z PL 2 FIRE |
The Jump button is also used to start the game.
Here's the board itself, two boards actually. There are two test switches, one on each board. You can use the test mode to calibrate the joystick. Mine works very well even after all these years, obviously when buying one it's imperative to ask the seller about its condition.


UPDATE: I eventually managed to buy an original control panel for the game, as shown below, with two joysticks. Unfortunately one joystick had a broken Hall Effect sensor so I had to install the joystick I had bought some time ago. As you can see the panel is pretty big, and has a metal plate in front. I can rest it on the shelf on which my monitors sit. I modified my JAMMA adaptor so that I could easily connect to the original wiring on the panel. The only thing missing is a coin switch, so I use my Sigma Raijin coin input for that.


No comments:
Post a Comment
Note: only a member of this blog may post a comment.